How to Build a Rain Garden: Three-Zone Planting
— Image © PlantReference.org 2026
Pets & Toxicity
Recorded toxicity for plants linked in this guide. An unknown status is not a safety assessment.
Toxic to pets: northern blue flag, swamp milkweedDetailsHide
Asclepias incarnata — Toxicity Warning
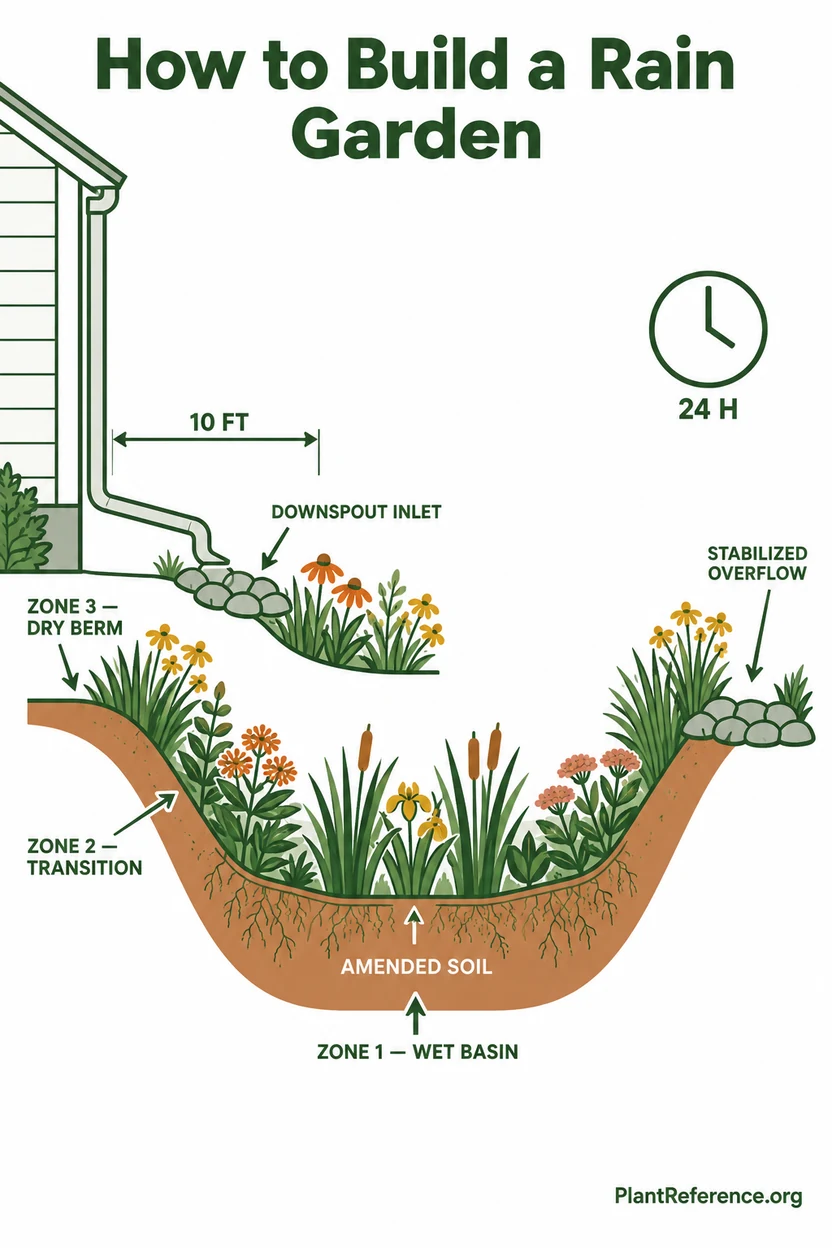
Toxic to pets and humansView Asclepias incarnata plant profileLearning how to build a rain garden starts with water movement, not a plant list. A rain garden is a shallow, planted depression that catches runoff from a roof, driveway, or other hard surface, holds it briefly, and lets it soak into living soil. The safest design sits away from the house, drains fully within 24 hours, and provides an overflow route for storms larger than the basin can hold.
Think of the finished shape as a shallow pie tin: a broad flat bottom, gently sloping sides, and a low berm on the downhill edge. That geometry spreads water instead of concentrating it in a deep pit. Once the grading works, three planting zones turn the basin into a resilient garden—wet-tolerant plants at the bottom, adaptable species on the slopes, and drought-tolerant roots on the berm.
Confirm the Site Before You Dig
Start by tracing runoff during an actual storm. Watch where a downspout or paved surface releases water, where the flow slows naturally, and where excess continues downhill. A rain garden should intercept that path without sending water toward the building, a neighbor, a septic field, or a steep unstable slope.
Keep the basin at least 10 feet (3 m) from a building foundation. More separation is sensible on a slope or beside a basement with a history of seepage. Call the local utility-marking service before any excavation, and check local rules for drainage easements, public rights-of-way, and stormwater connections. If the site stays wet for days before construction, it may need a different stormwater solution.
The soil test is the first real go-or-no-go decision. Dig a hole about 8 inches (20 cm) deep in the proposed basin, fill it with water, let the surrounding soil become wet, then fill it again and time the drop. The test hole and finished basin should drain within 24 hours. If water remains longer, relocate the garden or get site-specific drainage advice rather than building a mosquito pond.
This is different from a raised bed, but the same diagnostic habits apply. Poor Drainage in Raised Beds: Causes and Fixes for Waterlogged Soil explains how compaction and restrictive layers interrupt infiltration, while Fix PNW Garden Drainage: Glacial Till, Hardpan & Raised Beds shows why adding plants cannot repair an unsuitable subsurface.
Observe at least one moderate storm before choosing the inlet path.
Mark foundations, utilities, property boundaries, septic components, and existing trees.
Test infiltration at the intended basin depth, not only at the surface.
Reject any site that cannot drain the test hole within 24 hours.
Identify a safe downhill overflow route before calculating the final shape.
Design the Basin, Inlet, and Overflow
Measure the hard surface sending runoff to the garden and note whether the basin receives one downspout, part of a driveway, or several connected surfaces. Larger drainage areas and more intense storms produce more water. A residential guide or stormwater professional can convert those measurements, local rainfall, soil infiltration, and available ponding depth into a basin area. Do not copy a neighbor's dimensions when the contributing roof and soil are different.
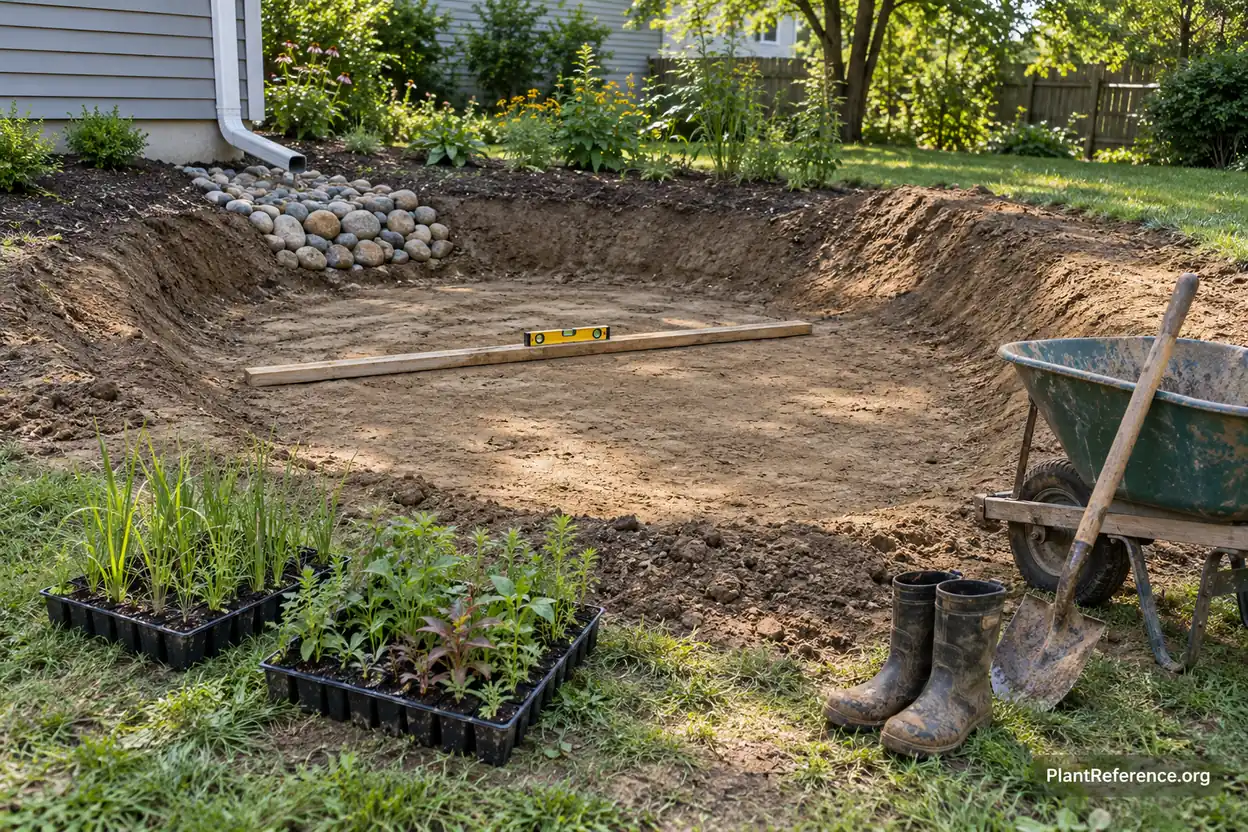
Lay out a broad shape across the slope. A kidney, oval, or soft rectangle can work, but the bottom must be level from end to end. On a sloping site, excavate the uphill portion and use compacted mineral soil to form the downhill berm. Check the base with a long board and level. A tilted bottom leaves one corner drowned while the rest barely receives water.
Keep the side slopes gentle enough to resist erosion and permit planting. The cross-section should resemble a pie tin, not a bucket: flat across the center, gradually rising at the edges. Avoid piling excavated subsoil over tree roots or burying the root flare of existing woody plants.
Build a Stable Inlet
Water arriving from a downspout needs a protected entry. Use a solid extension or shallow swale that ends on flat stone or a short apron of rounded rock. The hard surface spreads the initial force so water does not carve a channel through new soil. Keep the inlet accessible because leaves, roofing grit, and twigs collect there.
Provide Overflow Before Planting
Every rain garden eventually receives more water than it was sized to hold. Create a slightly lower, stabilized overflow point on the downhill side and direct it toward a safe vegetated route. Protect the sill with stone, dense sod outside the native planting, or erosion-resistant vegetation. Never let overflow aim at the foundation or cross a property line unexpectedly.
Prepare the Rain Garden Soil
Preserve workable native soil when it already drains at a suitable rate. Heavy compaction or poorly structured fill may need amendment, but indiscriminately digging a deep pocket of loose soil can create a bathtub above a restrictive layer. Excavate only to the designed grade, loosen smeared surfaces, and keep machinery off the basin bottom whenever possible.
The research-based amended blend is 50% sand, 25% finished compost, and 25% topsoil by volume. The sand creates pore space, compost supports biological activity, and topsoil gives roots a stable mineral matrix. Mix the components uniformly rather than layering them. Use clean coarse sand and mature compost; fine silt or unfinished material can defeat the purpose.
Treat that ratio as a starting specification, then adjust only with local soil guidance. A sandy native soil may not need more sand, while a dense urban fill site may need excavation or professional engineering. Best Soil Mix for Raised Beds: Creating the Perfect Growing Medium describes the roles of mineral and organic components, but a rain garden mix must prioritize rapid infiltration rather than vegetable-bed fertility.
Test soil pH before adding lime, sulfur, or fertilizer. Native rain garden plants usually perform better when selected for the existing chemistry than when the entire basin is forced into a narrow range. Raised Bed Soil pH Problems: Testing, Adjusting, and Maintaining Balance explains why measured correction beats routine amendment.
After grading, water the empty basin lightly and recheck the level. Correct low pockets before planting. The soil surface will settle, so keep the designed overflow sill visibly lower than the surrounding berm and never bury it under mulch.
Choose Plants for Three Hydrologic Zones
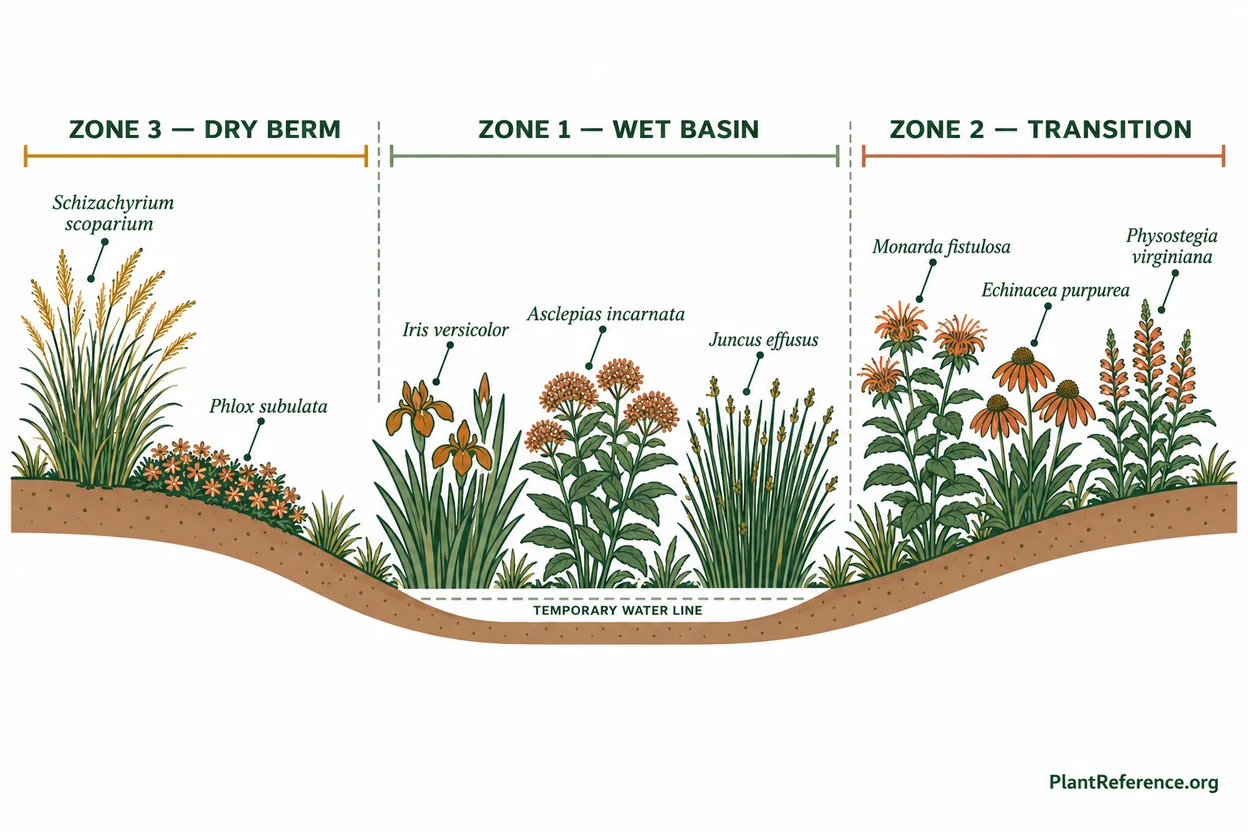
The three-zone system matches roots to the frequency and duration of saturation. Zone 1 occupies the flat bottom and receives the longest ponding. Zone 2 covers the side slopes and experiences short wet periods followed by drying. Zone 3 sits on the upper edge and berm, where soil drains first and can become quite dry between storms.
Hydrologic zone | Water pattern | Representative native plants | Primary design role |
|---|---|---|---|
Zone 1: wet bottom | Temporary ponding followed by complete drying | Stabilize the basin and tolerate wet feet | |
Zone 2: transition | Occasional saturation with frequent moisture swings | 🌿Monarda fistulosa, 🌿Echinacea purpurea, 🌿Physostegia virginiana | Connect wet and dry layers with long bloom |
Zone 3: dry berm | Brief wetting, fast drainage, summer dryness | Hold the berm and frame the basin |
Zone 1: Wet Bottom
Blue flag iris 🌿Iris versicolor (EYE-ris ver-si-KOL-or) handles periodic saturation and knits the basin with rhizomes. Swamp milkweed 🌿Asclepias incarnata (as-KLEE-pee-us in-kar-NAY-tuh) adds summer flowers and larval host value. Soft rush 🌿Juncus effusus (JUN-kus eh-FEW-sus) provides upright structure, slows shallow flow, and traps sediment near the inlet.
These are not aquatic plants for permanent water. The basin still must drain within 24 hours. Group them where ponding is most reliable, but leave the inlet visible for inspection and avoid blocking the overflow route.
Zone 2: Transition Slopes
Wild bergamot 🌿Monarda fistulosa (mo-NAR-da fis-tu-LO-sa), purple coneflower 🌿Echinacea purpurea (ek-in-AY-see-a pur-pur-EE-a), and obedient plant 🌿Physostegia virginiana (fy-so-STEE-jee-a vir-jin-ee-AN-a) tolerate moisture changes without requiring continuous wetness. Their contrasting flower forms also broaden pollinator access. See Best Perennials for Pollinators: Bees & Butterflies for a wider comparison of accessible blooms.
The transition zone is visually important because it occupies much of the visible slope. Plant in repeated groups instead of alternating one of each species. Perennial Combinations That Look Good Together offers practical guidance on repetition and compatible textures.
Zone 3: Dry Berm
Little bluestem 🌿Schizachyrium scoparium (ski-za-KY-ree-um sko-PAIR-ee-um) gives the berm fibrous roots and upright structure. Moss phlox 🌿Phlox subulata (FLOKS sub-yoo-LAY-ta) spreads low along the upper edge. Both belong above the regular ponding line, where the soil drains quickly.
Select locally native genotypes when possible, because a species' range and moisture tolerance can vary across North America. Use the examples as functional models, then confirm regional nativity and nursery provenance before buying.
Build and Plant the Rain Garden
Schedule construction during a reasonably dry period so exposed soil does not wash away before roots are installed. Mark the perimeter, inlet, overflow, and finished grades with paint or stakes. Strip turf separately from subsoil, then excavate in shallow passes. Use a long board and level repeatedly; fixing grade during digging is easier than moving established plants later.
Mark utilities, the 10-foot (3-m) setback, inlet path, basin edge, and overflow.
Remove turf and excavate the uphill side to create a broad, level bottom.
Form and compact the downhill berm without burying existing tree roots.
Install the inlet apron and stabilized overflow at their planned elevations.
Incorporate the specified soil blend where testing shows amendment is needed.
Set plants by zone, water deeply, and apply a thin erosion-resistant mulch layer.
Test the entire path with hose flow, then inspect it again during the next storm.
Set plugs at the depth they grew in their containers. Space them for mature spread while keeping the soil protected enough to resist erosion; 12 to 18 inches (30 to 45 cm) is common for many herbaceous plugs, but follow each species' mature width. Place rushes and sturdy wet-zone plants near inflow energy, flowering transition species across the slopes, and grasses along the berm.
Water each root ball thoroughly even though the project manages stormwater. New plants cannot rely on irregular runoff during establishment. A soaker hose can support the first season, but remove or reposition it once roots extend and rainfall patterns resume. When to Plant Perennials: Season-by-Season Timing can help choose a lower-stress installation window.
Use 2 to 3 inches (5 to 8 cm) of shredded hardwood mulch between new plants if the site is vulnerable to weeds or erosion, but keep mulch away from crowns and do not fill the basin like a bowl of chips. Avoid loose bark at the inlet, where it can float and clog the overflow. As plants close gaps, reduce replenishment and let living roots hold the soil.
Maintain Drainage and Plant Health
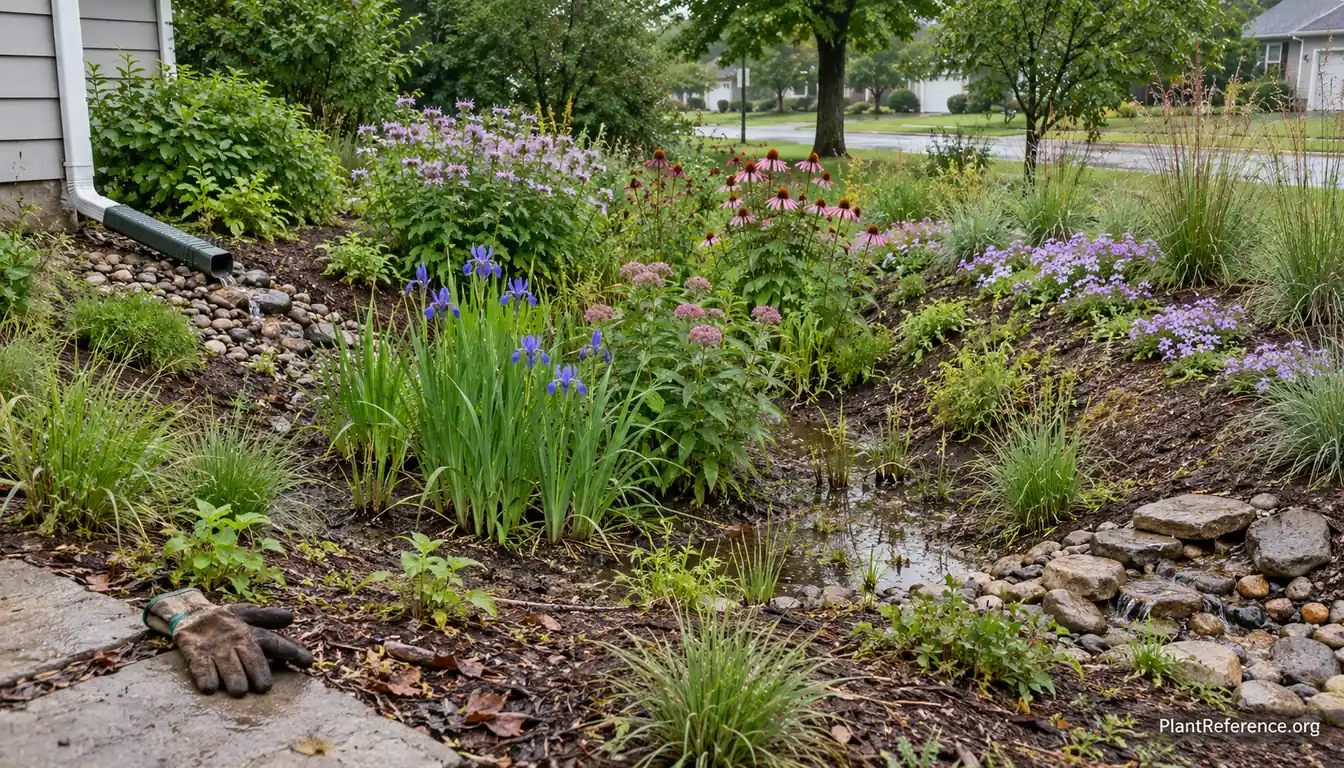
Inspect the rain garden during several storms in the first year. Water should enter without cutting a channel, spread across the level bottom, and leave through infiltration within 24 hours. During an unusually large event, overflow should cross the stabilized sill without eroding the berm. Photographing the same viewpoints makes gradual changes easier to see.
Remove sediment, leaves, and roofing debris from the inlet before they redirect flow. Pull weeds while small and replace dead plants with species suited to that exact zone, not simply with the same plant again. If a wet-zone species failed because the basin rarely receives runoff, either correct the inlet or choose a more drought-tolerant replacement.
Do not divide every successful clump on a schedule. Let roots form a stable matrix, then thin only where one species suppresses the rest or blocks inspection. How to Divide Perennials: A Species-by-Species Guide covers timing and clean division methods. For season-long structure, use Plan a Perennial Garden That Blooms Spring to Fall to check gaps without disrupting the hydraulic layout.
Avoid fertilizer unless a soil test identifies a specific deficiency. Excess nutrients can wash downstream, which defeats a stormwater garden's purpose. Leave stems and seed heads where they do not obstruct flow, and follow the habitat-minded cleanup approach in When to Cut Back Perennials in Fall (And What to Leave).
If the basin repeatedly holds water beyond 24 hours, stop treating the symptom with plants or pumps. Check for sediment sealing, compaction, a buried restrictive layer, or an undersized overflow. A chronic failure calls for redesign. A functioning rain garden should quietly receive, spread, infiltrate, and release stormwater without demanding emergency maintenance after every rain.
Frequently Asked Questions
Reading about plants and recognising them are different skills. These three build the second.
- Daily PlantIdentify the day’s mystery plant from a close-up photograph.
- Keyed OutWork a dichotomous key, lead by lead, to name a hidden specimen.
- Name That PlantName a specimen from botanical clues dealt hardest first.
Free to play, no account needed
Tagged with
Mike's been designing residential landscapes in the Seattle area, with a particular focus on Pacific Northwest natives and sustainable practices. He's a Washington State Master Gardener and worked in construction before landscaping, which gives him a practical edge when it comes to building raised beds and hardscaping projects. He runs a small side business propagating and selling unusual perennials at farmers markets on weekends. His property serves as a testing ground for low-maintenance, wildlife-friendly garden designs. Mike's philosophy: if it requires weekly maintenance, it's not sustainable.